Thursday, October 31, 2013
2nd Marking period
#11- First I open a new file in Photoshop, then wroter the 5W's with the color I want. Then makes the title Noche de Ciencias into glass text, then used the gradient tool to decorate the background. And then google search photos of STEM, then copy and paste the picture in a new layer. Then used the magic wand tool.
#12-First I open a new file, then find a suit.Use magic wand select the suit then go to Edit,select Cpoy Merged. Then press (Ctrl + V) into a new later, find a texture then go to Layer select Create Clipping Mask.
#13- First I open a file in Photoshop then find a picture of fries. Then used the magic wand tool to select the fries and go to edit and select Copy Merged. Then paste it on a new layer. And find a photo of fruit then click Create Clipping Mask. Save as JPG, then open a new file then wrote words for the benefit of fruits, and copy words on the poster below the picture.#14-First I open a new file in Photoshop, then find a picture of pumpkin and copy paste on a new layer in the file. Then I create a new layer which name sketch, then sketch the eyes,nose, and mouth on the pumpkin. Then choose Pen Tool and Magic Wand Tool to select the sketch then create a new layer name fill and fill it into black. Then follow the rest of the step in the website which Mr. Wang provide(http://www.adobetutorialz.com/articles/3011/1/Happy-Halloween-Ideas).
#15a- I open a new file then find a brick wall and flag, then change the blending mode to Hard Light. Then select the brick all and CTRL+J to duplicate the layer, then move the new layer above the flag layer and hit CTRL+SHIFT+U to desaturate it. Select the cpy layer then go to Filter-Blur-Gaussian Blur( enter the amount of blur desired for this tutorial 1px). Then save the displacment, Select the flag layer and go to Filter-Distort-Displace(enter the Horizontal and Vertical scale as 6) and select the Displacment Map, click OK. Finally select the brick layer and in the blending options choose Hard Light, then change the opacity to 80%.
#15b-First I open a new file, the do the same steps from #15a, but I replace the brick wall into my photo and UK flag into my China flag.
#16-First I open a new file, then follow the instruction in http://www.tutorialboard.net/understanding-and-using-smart-filters-in-photoshop-for-dynamic-adjustments/.
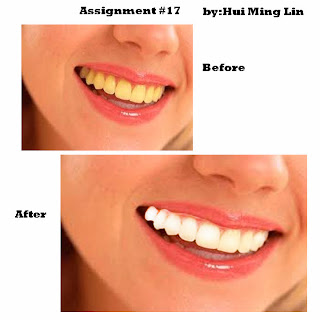
#17-First I open a new file, then find a picture of yellow teeth and copy paste it on the new file which I create. Then Set up the foreground color to black and background color to white. Click the Quick Mask then Brush tool, adjust the Master Diameter slider then color the teeth. Then click the Switch Foreground and Background Colors to make white as the foreground color, paint over the accidentally area. Then turn off the Quick Mask mode, click select, then click Inverse and then fill the color to white.
#18- First create a new file, then find a picture then copy and paste the picture on the file, then create a new layer then duplicate it.Click Filter. Then click Convert for Smart Filters, then click OK. Then click Filter-Blur-Gaussian Blur. Change the Radius slider to 5, then click OK. Then change the blending option to Screen. Click to add a layer mask. Select the Brush tool and click to open the Brush Picker, then click soft-edged brush just large enough to outline the eye area, and change the opacity to 40%. Paint over the eyes and mouth, then click and drag the Layer Opacity slider to 70%
First I open a new file in Adobe Illustrator, then used rectangles, circles, trapezoids, squares, and rounded rectangle to make the flash drive. Then used line tool to make lines, type tool to type words.
#20-Phone text- I used the instruction that the website gave. First open a file then create rectangle then go to Effect > Stylize > Round Corners to make it round. Then go to Object > Path > Offset Path to make an inner rounded rectangle. Used circle, winding and winding 3 to create the phone key.
Subscribe to:
Posts (Atom)


.jpg)